Configuring postfix to prevent your emails from being flagged as SPAM
This post describes how to properly defines postfix server properties to prevent your emails from being falsely flagged as spams or even rejected (especially by Google). It lists the different policies and tools that have to be checked to ensure a maximum probability to pass all filters. This post is dedicated to my old buddy Stéphanie, whose email (gmail) address often rejected (maybe not wrongly) my emails.
As a use case example, we will consider that the user (me) wants to send email from the addresses tuxette@mydomain.org and samantha@myotherdomain.wf via the mail server with name mail.mydomain.org. I own the two domain names mydomain.org and myotherdomain.wf. mail.mydomain.org has for IP XX.YYY.ZZZ.WW which reverses to the server name chix.mydomain.org. In addition, my server only sends email via IPV4 (option inet_protocols = ipv4 in the file /etc/postfix/main.cf to avoid painful headaches in configuring properly DNS and PTR for IPV6).
MX, PTR and reverse
All these records must be set properly (in my case, they are managed through the OVH user interface because my domain names are rented by OVH:
-
MX records for
myotherdomain.wfandmydomain.orgpoints tomail.mydomain.orgwhich means that all emails sent to@myotherdomain.wfand@mydomain.orgare directed to the mail servermail.mydomain.org. This rule writes</p>IN MX 1 mail.mydomain.org.
-
DNS and PTR records must also be properly set: the DNS record associates the IP
XX.YYY.ZZZ.WWto the mail servermail.mydomain.org. This rule is restricted to the domain namemydomain.organd writes</p>mail IN A XX.YYY.ZZZ.WW
Also, a PTR has to be set for the IP address
XX.YYY.ZZZ.WW. This PTR record associates a domain name to the IP, in my casechix.mydomain.org(hence, PRT does not necessarily points to the FQDN of the mail server butchix.mydomain.orgmust have a PTR record which matches the IPXX.YYY.ZZZ.WW). </li> </ul>All these records (as well as IP blacklisting) can be checked at this link. In particular:
-
MX Lookup should return
mydomain.orgwhen queried onmydomain.orgormyotherdomain.wf; -
Blacklisting Check should be OK for
XX.YYY.ZZZ.WW; -
Blacklisting Check should be OK for
XX.YYY.ZZZ.WW; -
DNS Lookup for
mail.mydomain.organdchix.mydomain.orgshould returnXX.YYY.ZZZ.WW; -
Reverse Lookup (PTR) for
XX.YYY.ZZZ.WWshould returnchix.mydomain.org; -
finally, both
mydomain.orgormyotherdomain.wfcan be checked for “Test Email Server” to find any anomaly in mail server configuration.
SPF
A SPF (Sender Policy Framework) record tells which servers/IP … are allowed to send emails for a given domain name. If no SPF is defined and an email is sent to a gmail address, you should see the following record in the headers:
Received-SPF: neutral (google.com: XX.YYY.ZZZ.WW is neither permitted nor denied
  by best guess record for domain of samantha@myotherdomain.wf)
  client-ip=XX.YYY.ZZZ.WW;
This framework can be used to tell the receiver’s email server that the email has actually been sent by the expected mail server. In my case, I created a SPF record for both
mydomain.organdmyotherdomain.wfwith the same policy which tells that the IP ofmydomain.organdmyotherdomain.wfare allowed to send emails as well as the MX ofmydomain.organdmyotherdomain.wf. Finally, I also explicitely authorized the IPXX.YYY.ZZZ.WWto send emails. This record writes600 IN TXT "v=spf1 a mx ip4:XX.YYY.ZZZ.WW ~all"
in which the
~alltells that this is a soft policy (maybe emails can be sent by other servers although it is not expected). OVH interface allows to configure in a very intuitive manner SPF.Sending an email to a gmail account, the received header should now look like:
Received-SPF: pass (google.com: domain of samantha@myotherdomain.wf designates
  XX.YYY.ZZZ.WW as permitted sender) client-ip=XX.YYY.ZZZ.WW;
More details about SPF at this link (in French). SPF records can be checked at this link.
DKIM
DKIM enables a domain name to be associated with an email message and thus to claim for responsibility for an email. DKIM is powered by asymmetric cryptography: a key is included in every email header which should match your DKIM record (TXT field corresponding to your domain name) in order to pass the DKIM filter. I installed it using the tutorial available at this link. First, opendkim tools have to be installed:
sudo apt-get install opendkim opendkim-tools
which configuration file
/etc/opendkim.confis edited to addAutoRestart Yes AutoRestartRate 10/1h UMask 002 Syslog yes SyslogSuccess Yes LogWhy Yes Canonicalization relaxed/simple ExternalIgnoreList refile:/etc/opendkim/TrustedHosts InternalHosts refile:/etc/opendkim/TrustedHosts KeyTable refile:/etc/opendkim/KeyTable SigningTable refile:/etc/opendkim/SigningTable Mode sv PidFile /var/run/opendkim/opendkim.pid SignatureAlgorithm rsa-sha256 UserID opendkim:opendkim Socket inet:12301@localhost
Then,
/etc/default/opendkimis editing and the following line is added:SOCKET="inet:12301@localhost"
To connect opendkim to postfix, edit the file
/etc/postfix/main.cfand add the following two lines:milter_protocol = 2 milter_default_action = accept
Create a file
/etc/opendkim/TrustedHostswith127.0.0.1 localhost 192.168.0.1/24 *.mydomain.org *.myotherdomain.wf
and a file
/etc/opendkim/KeyTablewithmail._domainkey.mydomain.org mydomain.org:mail:/etc/opendkim/keys/mydomain.org/mail.private mail._domainkey.myotherdomain.wf myotherdomain.wf:mail:/etc/opendkim/keys/myotherdomain.wf/mail.private
and also a file
/etc/opendkim/SigningTable
with*@mydomain.org mail._domainkey.mydomain.org *@myotherdomain.wf mail._domainkey.myotherdomain.wf
Finally, to generate the keys, create the following directories in
/etc/opendkim:keys/mydomain.orgkeys/myotherdomain.wfand runsudo opendkim-genkey -s mail -d mydomain.org sudo chown opendkim:opendkim mail.private
inside
/etc/opendkim/keys/mydomain.organdsudo opendkim-genkey -s mail -d myotherdomain.wf sudo chown opendkim:opendkim mail.private
inside
/etc/opendkim/keys/myotherdomain.wf.A DKIM record is then added to each of the two domain name:
mail._domainkey IN TXT "v=DKIM1; k=rsa; p=WWWWWWWWWWW"
in which
WWWWWWWWWWWhas to be replaced by the (long) text key available in the file/etc/opendkim/keys/mydomain.org/mail.txt(and similarly for the record DKIM record forclementine.wf). Then, an email received by gmail includes the following text in the headers:Authentication-Results: mx.google.com; spf=pass (google.com: domain of samantha@myotherdomain.wf designates XX.YYY.ZZZ.WW as permitted sender) smtp.mailfrom=samantha@myotherdomain.wf; dkim=pass header.i=@samantha@myotherdomain.wf;which tells that both DKIM and SPF filters have been successfully passed. Again, DKIM records can be checked at this link.
DMARC
Finally, SPF and DKIM can be monitored using a DMARC record. DMARC, which stands for “Domain-based Message Authentication, Reporting & Conformance”, standardizes how email receivers perform email authentication using the well-known SPF and DKIM mechanisms. This means that senders will experience consistent authentication results for their messages.
A DMARC rule can be recorded in a TXT field of your domain name (so, in the present use case for
mydomain.organdmyotherdomain.wf. A basic overview of how DMARC rules are created and work is available at this link. In my case, I created a DMARC record which takes no policy for domain mismatch, subject 10% of the messages to filter (this rule seems to be overridden by google anyway) and relaxed policy for alignment of SPF and DKIM records. Daily reports will be received attuxette@mydomain.org:_dmarc IN TXT "v=DMARC1;p=none;sp=reject;pct=10;adkim=r;aspf=r;fo=1; ri=86400;rua=mailto:tuxette@mydomain.org"
The reports can be checked and better understood using the tool available at this link. A proper DMARC record should lead to headers similar to:
Authentication-Results: mx.google.com; spf=pass (google.com: domain of samantha@myotherdomain.wf designates XX.YYY.ZZZ.WW as permitted sender) smtp.mailfrom=samantha@myotherdomain.wf; dkim=pass header.i=@samantha@myotherdomain.wf; dmarc=pass (p=NONE dis=NONE) header.from=samantha@myotherdomain.wfDMARC records can be checked at this link.
</div> -
MX Lookup should return
Passing arguments to an R script from command lines
This post describes how to pass external arguments to R when calling a Rscript with a command line. The case study presented here is very simple: a Rscript is called which needs, as an input, a file name (a text file containing data which are loaded into R to be processed) and which can also accept an optional additional argument (an output file name: if this argument is not provided, the program supplies one by default).
Note: The program just loads a text file containing data, filters out non numeric variables and writes a text file with remaining numeric variables only.
R style
The most natural way to pass arguments from the command line is to use the function commandArgs. This function scans the arguments which have been supplied when the current R session was invoked. So creating a script named sillyScript.R which starts with
#!/usr/bin/env Rscript
args = commandArgs(trailingOnly=TRUE)
and running the following command line
Rscript --vanilla sillyScript.R iris.txt out.txt
will create a string vector args which contains the entries iris.txt and out.txt. Missing and default arguments can be handled this way:
# test if there is at least one argument: if not, return an error
if (length(args)==0) {
  stop("At least one argument must be supplied (input file).\n", call.=FALSE)
} else if (length(args)==1) {
  # default output file
  args[2] = "out.txt"
}
The simple use case described in the introduction thus gives
## program...
df = read.table(args[1], header=TRUE)
num_vars = which(sapply(df, class)=="numeric")
df_out = df[ ,num_vars]
write.table(df_out, file=args[2], row.names=FALSE)
Finally, the command lines
Rscript --vanilla sillyScript.R iris.txt out.txt
or
Rscript --vanilla sillyScript.R iris.txt
will both load the file iris.txt, filter out the non numeric variables and write the resulting data in out.txt. Whereas running
Rscript --vanilla sillyScript.R
Error: At least one argument must be supplied (input file).
Execution halted
python style
One package allows to obtain the same result in a python-like style: the package optparse. The package can be used to perform a similar task. Basically, the package contains the functions
-
make_optionto declare options, their flags, types, default values and help messages; -
OptionParserto read the arguments passed to the R script andparse_argsto parse them according to what has been declared thanks tomake_option.
The functions are used as follows:
#!/usr/bin/env Rscript
library("optparse")

option_list = list(
  make_option(c("-f", "--file"), type="character", default=NULL,
              help="dataset file name", metavar="character"),
	make_option(c("-o", "--out"), type="character", default="out.txt",
              help="output file name [default= %default]", metavar="character")
);

opt_parser = OptionParser(option_list=option_list);
opt = parse_args(opt_parser);
which produces a list opt that contains all the arguments sorted by order of appearance in option_list and which can be called by their names as declared in this object: opt$file and opt$out. Then, managing null arguments is performed as follows:
if (is.null(opt$file)){
  print_help(opt_parser)
  stop("At least one argument must be supplied (input file).\n", call.=FALSE)
}
in which the function print_help print the help page of the option list as declared in the object option_list.
The remaining of the function is almost unchanged:
## program...
df = read.table(opt$file, header=TRUE)
num_vars = which(sapply(df, class)=="numeric")
df_out = df[ ,num_vars]
write.table(df_out, file=opt$out, row.names=FALSE)
If the entire script is saved in a file called yasrs.R,
Rscript --vanilla yasrs.R
will give
Usage: testScript.R [options]


Options:
  -f CHARACTER, --file=CHARACTER
		dataset file name

	-o CHARACTER, --out=CHARACTER
		output file name [default= out.txt]

	-h, --help
		Show this help message and exit


Error: At least one argument must be supplied (input file).
Execution halted
and
Rscript --vanilla yasrs.R --help
will print the help
Usage: testScript.R [options]


Options:
  -f CHARACTER, --file=CHARACTER
		dataset file name

	-o CHARACTER, --out=CHARACTER
		output file name [default= out.txt]

	-h, --help
		Show this help message and exit
and finally
Rscript --vanilla yasrs.R -f iris.txt
or
Rscript --vanilla yasrs.R -f iris.txt -o out.txt
will both create the file out.txt as described in the introduction of this post.
My dearest Céline, I hope that this post is explicit enough so that you can make your choice. Now you know that everything can be done with R, even this kind of map.
Additional note: in addition, a reader (thank you David) has pointed out that the script can be made executable using
chmod +x sillyScript.R
and then called with the command line:
./syllyScript.R iris.txt out.txt</p>


</p>
</div>
Yet another post on google scholar data analysis
Inspired by
this post, I wanted to use Google Scholar data to put nice images on my professional website (girly habit). This post explains how I combined the functions available in the R package scholar with additional analyses (partially inspired from the script available at this link, which in my case results in a cannot open the connection error message) to generate a few informative graphics.
Get a summary of all publications
Using the function get_publications in the package scholar, you can obtain a summary (title, authors, journal, volume and issue numbers, number of citations, year and google scholar ID) of all the paper a given author has published. However, the default publication displayed on the first page of an author’s google scholar profile is 20 so the function only returns the first 20 citations. A solution could have been to modify the package’s function to add a &pagesize=1000 (supposing that the author has less than 1000 publications, which seems reasonable enough) in the parsed URL. I chose a slightly different method, directly using the package function and that relies on the use of the argument cstart which tells from which citation the data acquisition should start. Hence, looping over this argument, we can retrieve all publications, 20 at each call of the function:
get_all_publications = function(authorid) {
  # initializing the publication list
  all_publications = NULL
  # initializing a counter for the citations
  cstart = 0
  # initializing a boolean that check if the loop should continue
  notstop = TRUE

  while (notstop) {
    new_publications = try(get_publications(my_id, cstart=cstart), silent=TRUE)
    if (class(new_publications)=="try-error") {
      notstop = FALSE
    } else {
      # append publication list
      all_publications = rbind(all_publications, new_publications)
      cstart=cstart+20
    }
  }
  return(all_publications)
}
In my case, the use of this function gives:
library(scholar)
my_id = "MY GOOGLE SCHOLAR ID"
all_publications = get_all_publications(my_id)
dim(all_publications)
# [1] 122   8
table(all_publications$year)
# 2004 2005 2006 2007 2008 2009 2010 2011 2012 2013 2014 2015
#    1    4    7    7    8    9    7    9   12   11   18    7
summary(all_publications$cites)
#    Min. 1st Qu.  Median    Mean 3rd Qu.    Max.
#   0.000   0.000   0.000   5.566   5.000 140.000
Find all co-authors
From the previously obtained publication list, we can also retrieve all co-authors. This is done by using the column author and by splitting it on the character “, “. Additionally, for long authorship lists, the author "..." has also to be removed (which biases a bit the list actually…):
get_all_coauthors = function(my_id, me=NULL) {
  all_publications = get_all_publications(my_id)
  if (is.null(me))
    me = strsplit(get_profile(my_id)$name, " ")[[1]][2]
  # make the author list a character vector
  all_authors = sapply(all_publications$author, as.character)
  # split it over ", "
  all_authors = unlist(sapply(all_authors, strsplit, ", "))
  names(all_authors) = NULL
  # remove "..." and yourself
  all_authors = all_authors[!(all_authors %in% c("..."))]
  all_authors = all_authors[-grep(me, all_authors)]
  # make a data frame with authors by decreasing number of appearance
  all_authors = data.frame(name=factor(all_authors,
    levels=names(sort(table(all_authors),decreasing=TRUE))))
}
The argument me is used to remove yourself from your own co-authorship list. By default, it will use your family name as recorded in your google scholar profile (if your family name is the second word of your whole name). In my case, I used two names in my publications so manually provided the argument:
all_authors = get_all_coauthors(my_id, me="PART OF MY NAME")
After a bit of cleaning up (removing co-authors who are only cited once, fixing some encoding issues…), I obtained the following image:
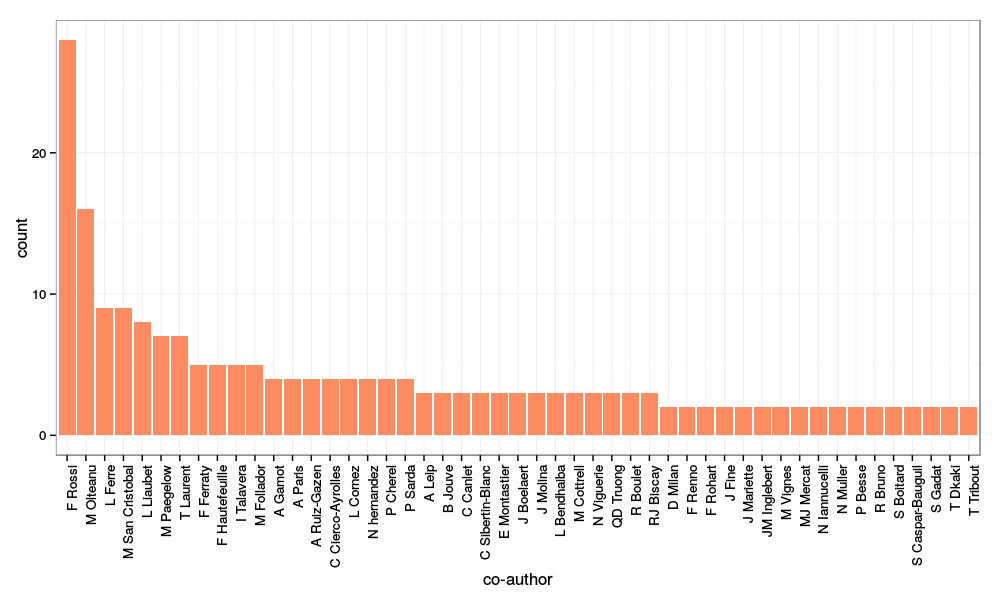
with (among other commands for cleaning up the data a bit):
main_authors = all_authors[all_authors$name %in% names(which(table(all_authors$name)>1)), ]
library(ggplot2)
p = ggplot(main_authors, aes(x=name)) + geom_bar(fill=brewer.pal(3, "Set2")[2]) +
  xlab("co-author") + theme_bw() + theme(axis.text.x = element_text(angle=90, hjust=1))
print(p)
Analysis of the words in the abstracts
Finally, looping over the publication IDs, we can retrieve all the abstracts of the publication list to make a basic text mining analysis. To do so, I used the package XML which provides many functions for web scraping. I first defined a function to get one article’s abstract from its google ID (and the author’s google ID):
get_abstract = function(pub_id, my_id) {
  print(pub_id)
  paper_url = paste0("http://scholar.google.com/citations?view_op=view_citation&hl=fr&user=",
                     my_id, "&citation_for_view=", my_id,":", pub_id)
  paper_page = htmlTreeParse(paper_url, useInternalNodes=TRUE, encoding="utf-8")
  paper_abstract = xpathSApply(paper_page, "//div[@id='gsc_descr']", xmlValue)
  return(paper_abstract)
}
Then, looping over the data frame all_publications that have been previously retrieved from google scholar, we obtain the list of all abstracts.
get_all_abstracts = function(my_id) {
  all_publications = get_all_publications(my_id)
  all_abstracts = sapply(all_publications$pubid, get_abstract, my_id=my_id)
  return(all_abstracts)
}
Then, the package tm is used to obtain a publication/term matrix and finally a term frequency matrix that can be processed with the package wordcloud to obtain

library(XML)
all_abstracts = get_all_abstracts(my_id)
library(tm)
# transform the abstracts into "plan text documents"
all_abstracts = lapply(all_abstracts, PlainTextDocument)
# find term frequencies within each abstract
terms_freq = lapply(all_abstracts, termFreq,
                    control=list(removePunctuation=TRUE, stopwords=TRUE, removeNumbers=TRUE))
# finally obtain the abstract/term frequency matrix
all_words = unique(unlist(lapply(terms_freq, names)))
matrix_terms_freq = lapply(terms_freq, function(astring) {
  res = rep(0, length(all_words))
  res[match(names(astring), all_words)] = astring
  return(res)
})
matrix_terms_freq = Reduce("rbind", matrix_terms_freq)
colnames(matrix_terms_freq) = all_words
# deduce the term frequencies
words_freq = apply(matrix_terms_freq, 2, sum)
# keep only the most frequent and after a bit of cleaning up (not shown) make the word cloud
important = words_freq[words_freq > 10]
library(wordcloud)
wordcloud(names(important), important, random.color=TRUE, random.order=TRUE,
          color=brewer.pal(12, "Set3"), min.freq=1, max.words=length(important), scale=c(3, 0.3))
Removing all kernel headers and images from my computer: I did it!!!
This post could be subtitled: because I only have half a brain. But fortunately
- first, it was not my computer but my son’s computer (and I don’t give a s*** to his computer which mainly contains video games);
- second, using half a sleepless night, I finally succeded to fix this problem.
Episode 1: the accident
My son’s computer is equipped with xUbuntu 14.04 LTS and LVM volume manager and I am naive enough to let him manage it by himself. Unfortunately, he does not read his mom’s blog and when he encoutered the very simple problem described in this post, he just stopped to upgrade his OS. I am the best mom ever so started to fix this issue and cleaned up a bit of the mess he has generated. I just only use an unecessary star; never, ever run the following command line:
sudo apt-get remove --purge linux-image-3.13.*-generic linux-headers-3.13.*-generic
because it will remove all linux kernels and images. I just wanted to remove the older one but was too quick writing the command line and forgot to put the critical 0-4 before the star… Ok, that’s brainless (I am a woman, it can maybe explain things) and worst of all: I rebooted just after this brillant action…!!! In this case, what happens is pretty simple: your /boot directory only contains the following files:
memtest86+.bin memtest86+.elf memtest86+_multiboot.bin
and the grub menu then tells your computer to directly boot on the memory test utility.
Episode 2: a problem never comes alone
I already had a very similar problem during the upgrade of an older linux distribution before (see this post for further references). However, in the previous case, I was using a standard volume management whereas my son’s computer uses LVM. Hence,
- booting on an external USB device
-
trying the standard
sudo mount /dev/sda5 /mnt
to mount the main linux partition
/gives the following error message:mount: you must specify the filesystem type
Episode 3: Best Mom Ever solves the damned problem that she has herself created
So after a few tests, I found the solution which consisted in:
- booting on an external USB device
-
mounting the LVM volume partition on the USB device’s system with the method described on this page: first, the list of partitions is obtained with:
sudo pvs
which (in my case) gives:
PV          VG          Fmt     Attr     PSize     PFree
/dev/sda5   xubuntu-vg  lvm2    a--      465.52g   52,00m
and indicates that the volume group to which our physical volume
/dev/sda5belongs is calledxubuntu-vg. Then the commandsudo lvdisplay /dev/xubuntu-vg
starts with
LV PATH     /dev/xubuntu-vg/root
LV Name     root
VG Name     xubuntu-vg
and it can thus be mounted with:
sudo mount /dev/xubuntu-vg/root /mnt
-
The purpose is now to chroot into
/mntwhich contains the computer’s system. Before doing so, a few additional directory has to be mounted:sudo mount --bind /dev /mnt/dev sudo mount --bind /proc /mnt/proc sudo mount --bind /sys /mnt/sys sudo mount --bind /var/run/dbus /mnt/var/run/dbus
and most importantly,
sudo mount /dev/sda1 /mnt/boot
to mount the
/bootdirectory of your computer before chrooting into it. </li> -
chrooting into
/mntwithsudo chroot /mnt
To check that everything was OK, I did:
cd /boot
ls
which confirmed that the
/bootdirectory only contained:memtest86+.bin memtest86+.elf memtest86+_multiboot.bin
At this stage, if
/bootis empty, you have failed to mount the/bootdirectory of your system. </li> -
Now, simply fix the problem by installing the current linux header and image:
sudo apt-get install linux-image-generic linux-headers-generic
and everything should be just fine at the next reboot.</li> </ol>
</div>
Solving the issue “not enough free space” during Ubuntu upgrades under LVM
Upgrading my xUbuntu OS (14.04 LTS), I sometimes have the following error message:
The upgrade needs a total of XXX M free space on disk
"/boot". Please free at least an additional YYY M of
disk space on "/boot". Empty your trash and remove
temporary packages of former installations using
'sudo apt-get clean'.
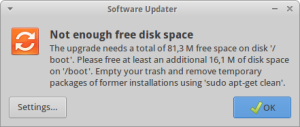

In my case, I am using LVM (Logical Volume Manager (click here for further informations and the directory /boot is mounted from a separate partition with a fixed limited size. The total free space available on this volume can be exceeded when too many versions of the linux kernel have been installed on the computer. Solving this issue is however very simple and only requires to remove the oldest kernels.
-
first go the the directory
/bootand check which version of the linux kernel have been installed (cd /bootand thenls). You should have something similar to this image: (well, maybe in your case, the colors are a bit less dreadful), which says that you can safely remove version
 3.13.0-53and3.13.0-54of the linux kernel at least. -
second, you have to find which version of the kernel you are using, which depends on your computer. This is obtained with
uname -a
In my case, the answer is:
Linux NAME 3.13.0-57-generic #95-Ubuntu SMP
  Fri Jun 19 09:28:15 UTC 2015 x86_64 x86_64 x86_64 GNU/Linux
The version of the kernel that I am using is thus the
generic.</li> -
finally, just remove the oldest linux image and header packages with:
sudo apt-get remove --purge linux-image-3.13.0-54-generic
  linux-image-3.13.0-53-generic linux-headers-3.13.0-53-generic
  linux-headers-3.13.0-54-generic
sudo apt-get clean
</ol>
And that’s it! Be careful not to remove all linux images and kernels though: you would not be able to reboot your computer…!! This issue will be adressed in my next post 😉
</div>
