Utiliser Git sous Mac OS X
Ce post décrit les différents étapes pour installer, configurer et utiliser git sous Mac OS X.
Étape 1 : Installation de git
L’installation de git peut être effectuée en téléchargeant le package compilé à ce lien. Un double clic sur le fichier téléchargé devrait permettre l’installation complète de git (non testé).
A priori, cette étape suffit, néanmoins, pour des facilités d’utilisation (particulièrement si vous êtes allergique à la ligne de commande), vous aurez peut-être envie d’installer également une interface graphique git (git est normalement installé avec une interface graphique minimale mais très utile, gitk). La liste des clients graphiques git est disponible à ce lien. Pour ma part, je décrirai à la fin de ce tutoriel comment utiliser git avec RStudio (desktop) qui est fréquemment utilisé par les statisticiens.
Étape 2 : Configuration de git
La configuration de git consiste essentiellement à indiquer un nom d’utilisateur et un email pour identifier les messages de commit. Je choisis aussi généralement “nano” comme éditeur de messages par défaut (plus simple que VI). Pour cela, il suffit de taper dans un terminal :
git config --global user.name "Tuxette Chix"
git config --global user.email "tuxette@myserver.org"
git config --global core.editor nano
Étape 3 : Configurer son premier dépôt
Si le dépôt est accessible via une clé ssh (et non par login/mot de passe)
Il faut créer sa clé… Cette étape se fait en entrant les lignes de commandes suivantes dans un terminal :
ssh-keygen -t rsa
Vous pouvez utiliser l’emplacement par défaut proposé par le programme de génération ou bien en fournir un nouveau. Dans tous les cas, retenez bien le chemin indiqué pour retrouver votre clé. Généralement (non testé), la clé est enregistrée à ~/.ssh/id_rsa. Dans ce cas, cela signifie que deux fichiers ont été générés :
-
le fichier
~/.ssh/id_rsaqui est la clé privée et ne doit être en aucun cas copiée ou diffusée ; -
le fichier
~/.ssh/id_rsa.pubqui est la clé publique et doit être fournie au gestionnaire du dépôt git pour configuration de votre accès.
Avant toute utilisation du dépôt, la clé ssh doit être activée par la ligne de commande :
ssh-add ~/.ssh/id_rsa
Normalement, cette commande est nécessaire à chaque nouveau démarrage de session ou de la machine (non testé).
Rapatrier le dépôt
Une fois les accès (login+mot de passe ou clé ssh) correctement configurés, on peut rapatrier (c’est-à-dire clôner) son premier dépôt. Le gestionnaire du dépôt vous fournit l’URL du dépôt et vous pouvez alors taper la ligne de commande :
git clone gitolite@gitserver.com:project.git project
(dans cet exemple, gitserver.com est le nom du serveur git qui utilise ici une configuration via gitolite et project.git est le nom du projet à clôner ; project est le nom du dossier local dans lequel vous voulez clôner le projet).
Étape 4 : Utiliser son dépôt
L’utilisation de base peut être effectuée via un terminal de manière très simple. Il suffit de se déplacer jusqu’à l’intérieur du dossier project. Pour visualiser ce qui se passe, la commande
gitk &
ouvrira le logiciel gitk et permettra de voir l’état des différentes versions de manière simple. L’utilisation comporte généralement 3 étapes :
-
enregistrer localement les modifications effectuées sur les fichiers
git commit -a
Un message décrivant les modifications (généralement une courte ligne) est demandé.</li>
-
rapatrier les versions envoyées sur le serveur par les autres utilisateurs
git pull
Si des conflits d’édition ont été repérés, git indique dans quel fichier ils se trouvent : il faut alors éditer ce fichier et identifier les balises permettant de montrer les différences entre versions. Une fois les conflits réglés, on peut alors valider la fusion par
git commit -a
-
envoyer la fusion des différentes versions sur le serveur
git push
(ou en cas de message d’erreur)
git push origin master
</ol>
Étape 5 : Git et RStudio
Pour gérer son projet git avec RStudio, il suffit de créer un nouveau projet RStudio correspondant au dossier project après l’avoir clôné. Une icône “Git” apparaît alors dans la barre d’outils qui donne accès à une interface graphique pour Git.
Installer scratch 2 sur xUbuntu 16.04 LTS
scratch est un langage de programmation visuel conçu pour faire acquérir les bases de la programmation aux enfants et qui est orienté multimédia. Sur xUbuntu 16.04 LTS, le package scratch effectue l’installation de la version 1 de scratch. Pour la version 2, qui est très bien accompagnée des livres « scratch pour les kids » publiés aux édition Eyrolles :


l’installation peut s’effectuer comme suit :
-
scratch2 requiert l’installation d’Adobe Integrated Runtime (AIR) dont la version linux peut s’installer en téléchargeant le script disponible à ce lien (source : http://www.noobslab.com/2015/05/adobeair-is-now-available-for-ubuntu.html) et en l’utilisant avec les lignes de commande suivantes :
sudo chmod +x adobe-air.sh
sudo ./adobe-air.sh
-
une fois Adobe AIR installé, scratch 2 peut-être installé en récupérant le fichier lié à « linux » sous le point 2 de la page à ce lien. L’exécution de Adobe AIR en mode super-utilisateur est requise pour l’utilisation de ce fichier :
sudo Adobe\ AIR\ Application\ Installer
Indiquer, dans la fenêtre qui s’ouvre, le fichier à installer qui est le fichier téléchargé sur le site de scratch indiqué ci-dessus.</li> </ol>
scratch2 est disponible en français : une fois le logiciel lancé, cliquez sur l’icône
</div> pour choisir la langue de votre choix. Enfin, pour profiter pleinement des excellents livres décrits au-dessus, il est nécessaire de finalement télécharger les compléments du livre à ce lien (ils sont malheureusement un peu difficiles à trouver).
Parental control on Ubuntu
As a mother of two, I’ve tried many times to automatically restrict the way my kids (9 and 12) are allowed to use their computer. I had previously (and unsuccessfully) tried
- timekpr but it would never install, resulting in many dependency errors;
- nanny but it does not seem to be available for recent distributions.
I have thus used a third solution which is perfect for my needs and described on this page (in French). It is based on a simple script which has to be manually installed. The script can be downloaded here (for Ubuntu 16.04 users) or here (for Ubuntu 12.04-14.04). It is documented in French but I think that it is easy enough to understand to be used by other people (and if someone not speaking French wants to use it, I volunteer to give him/her a hand). The script is downloaded and installed from the command line using:
wget https://github.com/marsat/CTparental/releases/download/4.16.8/ctparental_debian_testing4.16.8-1.1_all.deb
sudo dpkg -i ctparental_debian_testing4.16.8-1.1_all.deb
sudo apt-get install -f
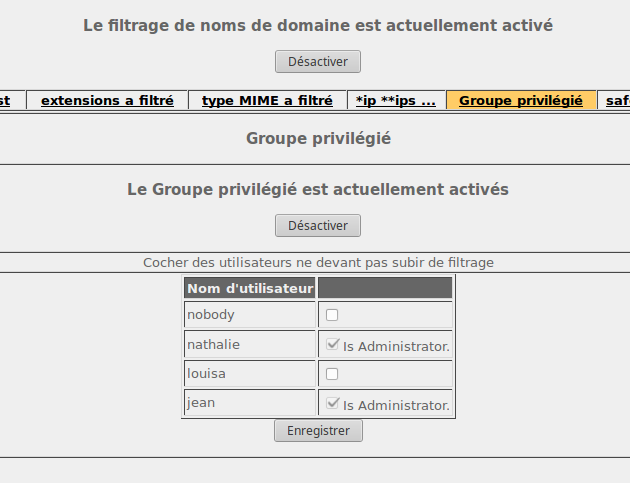
The last command line is used to fix the dependency problems which result from the manual installation of the script. When running it, you are asked to provide a login and a password for the script administrator (you). Once the installation completed, open any web browser and enter the URL http://127.0.0.1/CTadmin. The script does two things: the first one is that it restricts the URL which can be visited by the user (it has a blacklist and a whitelist, maintained by the university of Toulouse and it can filter out some extensions and file types, as well as some IPs). A special attention has to be given to the tab “Groupe privilégié” (which means privileged user) on which you can choose which users have full access to internet (in the example “nathalie” and “jean” have full access because they are mum and dad :)):
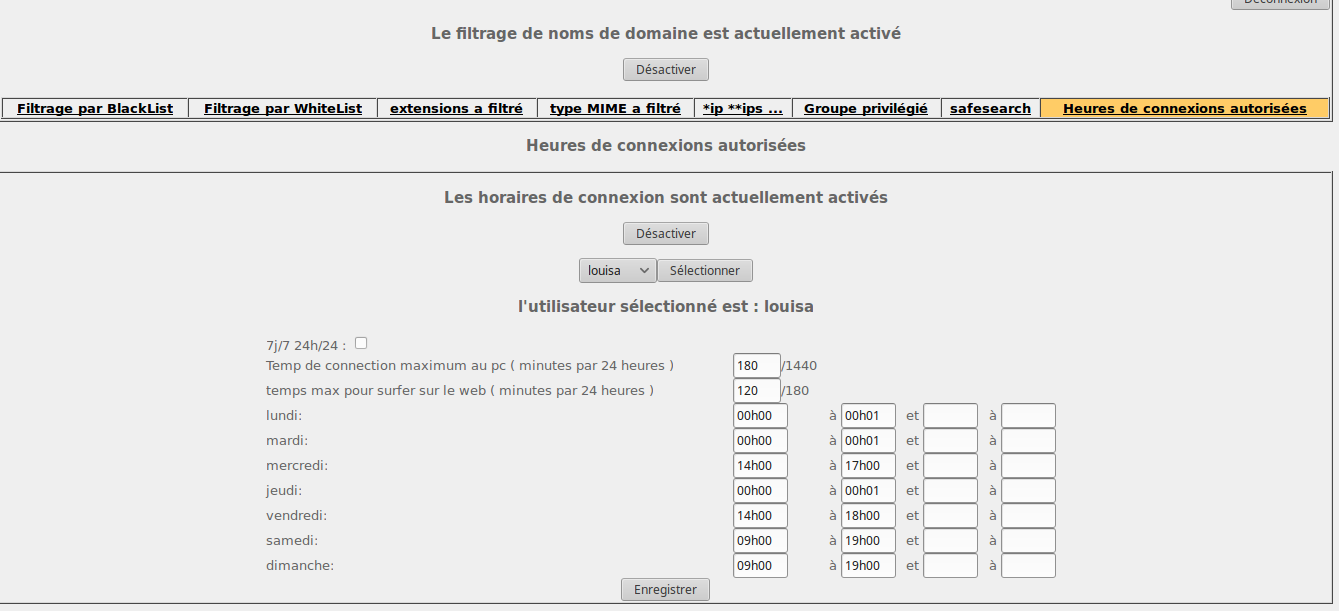
 Finally, the tab “Heures de connexion autorisées” (“allowed connexion time”) can be configured. For instance, in the example below, the user “louisa” is allowed to use her computer maximum 3 hours a day, including maximum 2 hours of internet connexion. She is not allowed to use it on Monday, Tuesday and Thursday and is restricted to use it on the afternoon only on Wednesday and Friday.
 As a mother of two, I’ve tried many times to automatically restrict the way my kids (9 and 12) are allowed to use their computer. I had previously (and unsuccessfully) tried
- timekpr but it would never install, resulting in many dependency errors;
- nanny but it does not seem to be available for recent distributions.
I have thus used a third solution which is perfect for my needs and described on this page (in French). It is based on a simple script which has to be manually installed. The script can be downloaded here (for Ubuntu 16.04 users) or here (for Ubuntu 12.04-14.04). It is documented in French but I think that it is easy enough to understand to be used by other people (and if someone not speaking French wants to use it, I volunteer to give him/her a hand). The script is downloaded and installed from the command line using:
wget https://github.com/marsat/CTparental/releases/download/4.16.8/ctparental_debian_testing4.16.8-1.1_all.deb
sudo dpkg -i ctparental_debian_testing4.16.8-1.1_all.deb
sudo apt-get install -f
The last command line is used to fix the dependency problems which result from the manual installation of the script. When running it, you are asked to provide a login and a password for the script administrator (you). Once the installation completed, open any web browser and enter the URL http://127.0.0.1/CTadmin. The script does two things: the first one is that it restricts the URL which can be visited by the user (it has a blacklist and a whitelist, maintained by the university of Toulouse and it can filter out some extensions and file types, as well as some IPs). A special attention has to be given to the tab “Groupe privilégié” (which means privileged user) on which you can choose which users have full access to internet (in the example “nathalie” and “jean” have full access because they are mum and dad :)):
Finally, the tab “Heures de connexion autorisées” (“allowed connexion time”) can be configured. For instance, in the example below, the user “louisa” is allowed to use her computer maximum 3 hours a day, including maximum 2 hours of internet connexion. She is not allowed to use it on Monday, Tuesday and Thursday and is restricted to use it on the afternoon only on Wednesday and Friday.
Configuring Gmail and external email clients for professional use
Some of my colleagues (many of them actually) are using gmail as their email client for professional purpose. It usually works not too bad when using it from gmail (you can use your primary email address to send email for instance with the “reply to” field filled with your primary email) but some people struggle to properly configure their account for external use ( Stéphanie is again one of them…), especially on their smartphone. Some instead of sending email with their primary email adresse, they send it with their gmail account, which is not the expected behavior). In this post, I’ll help them do a good job configuring gmail to manage professional emails (even though, I must warn them that doing so is evil).
Create your professional account in gmail
Go to Settings / Accounts and Import and click on “Add another email address you own”. In the “Email address” field, enter your name and the alternate email address you own (for instance tuxette@my-company.fr). I advise not to choose the “Treat as an alias” option (the differences between the two options is explained on this page). The SMTP server of your company must be used to send the emails from google: enter your SMTP server settings and click on “Add account”. A confirmation code is sent to your primary email address which must be entered in gmail form to confirm that you own this account. This allows you to send emails from your email address tuxette@my-company.fr.
To read Tuxette’s email, click on “Add a POP3 mail account you own” and enter your POP3 settings.
Configure your gmail account on Android or any other email client you want to use
I describe how to configure gmail so that it synchronizes emails from your gmail account (tuxette.gmail@gmail.com for instance) and properly sends email with your primary email account using gmail (tuxette@my-company.fr). I will describe the configuration with the Email app on Android but it is fairly standard and can be used with any other email client (if you do not use the gmail app). I recommand the use of K9-mail which I find very good (especially since it can manage identities), but any other email client can be configured in the way I describe below.
You first need to make two additional steps in gmail settings to use gmail from an external email client:
- First, in Forwarding and POP/IMAP, click on Enable IMAP
- Second, you must turn on access for less secure app at this link
Then, open your email client on your android device and fill the first screen as described here:
- on the first screen, the email address is your primary email address (tuxette@my-company.fr) and your password is your gmail password. Then click on “Manual configuration”
- click on “IMAP account”. The form must be filled as follow: your email address is unchanged (tuxette@my-company.fr), your user name is your gmail user name tuxette.gmail), your password is your gmail password, the IMAP server is imap.gmail.com / SSL / 993, then click on “NEXT”
- the SMTP server can be configured in two different ways: either you use gmail SMTP server (which will probably rely on your company SMTP server) or you can use directly your company SMTP server. To use the first solution, enter the SMTP server setting smtp.gmail.com/SSL/465, your gmail user name and password.
You’re done! Stéphanie, I know that you are aware of how much I like chocolate 😉
Using FUSE ssh to mount/unmount a remote directory
I recently helped a colleague (who wants to remain anonymous so let’s call him
Stéphanie for the sake of secrecy) installing xUbuntu OS on his computer and remarked that he was using sshfs to mount remote folders over a SSH connexion. However, the trick was used through a crappy alias included in his .bash_history, which I do not like to use. I searched for a cleaner way to achieve a similar configuration using fstab and the mount/umount commands. So, this is the story… (and btw, thank you Stéphanie for pointing out the tool).
Use case description
Suppose that we have the following situation:
-
a local computer, called
daemon, on which I want to mount a remote folder. In my case, the computer runs on xUbuntu OS, version 14.04 LTS and the user is calledtuxette; -
a remote server, called
far, which can be reached by a user calledprothrough a SSH connexion.
Installation
sshfs is simply installed on (X)Ubuntu OS using:
sudo apt-get install sshfs
Eventually, you may need to add the user (I mean, you) to the fuse group to allow you to use FUSE userland filesystem utility (let’s call the user tuxette):
sudo gpasswd -a tuxette fuse
Configuration
SSH access with public/private key pair
First, it is strongly advised that far can be accessed using public/private keys from daemon: this will prevent you from having your password prompted each time you want to mount the remote folder. For doing it,
-
first create a public/private key pair on
daemonwithssh-keygen -t dsa
Using the default option, the keys are stored in
~/.ssh/id_dsa(private key) and~/.ssh/id_dsa.pub(public key);</li> -
copy the public key in
~/.ssh/authorized_keysonfar:scp ~/.ssh/id_dsa.pub pro@far:.ssh/authorized_keys
if the file
~/.ssh/authorized_keysdoes not already exists orssh-copy-id -i ~/.ssh/id_dsa.pub pro@far
to append the new key in
~/.ssh/authorized_keysif it has previously been created.</li> </ol>SSHFS configuration
If you simply modify the file
/etc/fstabas described in this tutorial, you will be able to mount easily your directory but umounting it will result in the following error message:umount: PATH-TO-LOCAL-MOUNT mount disagrees with the fstab
Solving this issue simply demands to create an alias to the command line
mount.fuseusing the following command line:sudo ln -s mount.fuse /usr/bin/mount.fuse.sshfs
Modify fstab
Suppose that you have created a local directory
~/mnt/farmountondaemonin which you want to mount the remote home folder onfar(I like to have all my shared folders (remote mounted directories, owncloud, dropbox – yes, sorry, some of my colleagues force me to use dropbox… -, etc) stored in the same directory~/mnt/but you are free to mount the remote folder wherever you want). Then, using administrator privileges, edit the file/etc/fstabto add the following line:pro@far:./ /home/tuxette/mnt/farmount fuse.sshfs defaults,idmap=user,user,rw,noauto,follow_symlinks 0 0
Using your new configuration
… is as simple as breathing (from your user’s root directory on
daemon):mount mnt/farmount
will mount the remote directory and
umount mnt/farmount
will unmount it.
</div>

