Step 1 of Ubuntu 18.04 server installation: flashdisk installation and UEFI
This first post describes the first installation of Ubuntu server 18.04 LTS on my EliteBook 8570p. More precisely, it describes how to deal with UEFI installation that (if not well handled) can lead to a BootDevice not found error on first attempt to startup the server after installation.
First step: preparing the bootable flashdisk
After downloading the last version of Ubuntu server at this link, I created a bootable USB device with UNetbootin to avoid the error described in this post after having used usb-creator. UNetbootin is installed with
sudo apt install unetbootin
and has to be run as sudo (otherwise, it asks for the root password and does not want to start).
Second step: BIOS configuration
Before you start, be sure that UEFI (secure boot) is properly configured on your computer. The solution might depend on the precise model but for me I had to:
- enter the BIOS and set a supervisor password for security
- save and exit the BIOS, restart and re-enter the BIOS. At this point, I enabled UEFI boot mode. Default UEFI boot priority options worked for me.
Last step: installation
I restarted the computer with the bootable flashdisk inserted and boot on it (Echap + F9 in my case) then simply followed the installation instructions. A last restart (without the flashdisk inserted), gave me access to the server.
Mattermost installation with Apache redirection on Ubuntu 16.04
Mattermost is an open-source alternative to slack. It is easily installed on Ubuntu 16.04 LTS but apache2 configuration needs tricking a bit to set up SSL encryption properly. Here is my solution.
- Step 1: Mattermost installation is well described at this link. I have installed it with a mysql database and I simply followed the instructions described in sections
-
Step 2: At this step, to properly run mattermost, I needed to open the proper tcp port (8065) for shorewall. This was performed by editing (as root) the file
/etc/shorewall/rulesand adding the lineACCEPT net $FW tcp 8065
shorewall then needs a restart with
sudo service shorewall restart
mattermost can be started with
sudo service mattermost start
At this step, you should have access to mattermost at
http://your-domain.org:3065. You can create a first user that will be the administrator (choose a strong password for that user).</li> -
Step 3: Configuring the apache2 redirection with a proper SSL encryption is performed as follows:
-
first, the following apache2 modules must be enabled:
ssl,proxy,proxy_http,proxy_wstunnel. You can load then using the following command lines:sudo a2enmod ssl proxy proxy_http proxy_wstunnel sudo service apache2 reload
-
second, create the virtual user in
/etc/apache2/sites-available/mattermost.confas follows:
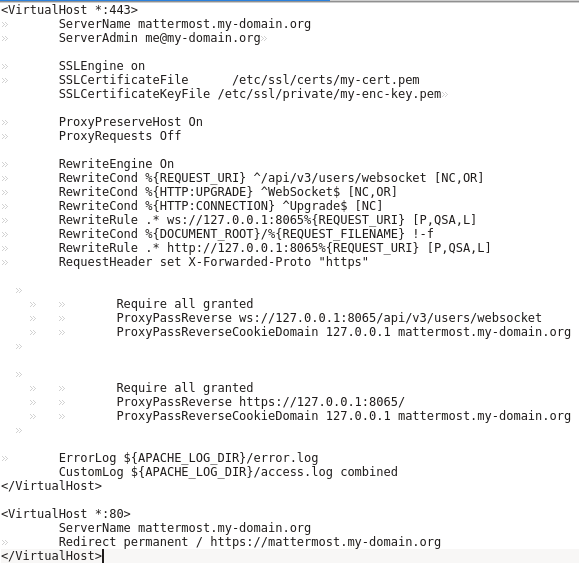
where the SSL certificates are created as described in this previous post. Finally, enable its use with</p>sudo a2ensite mattermost sudo service apache2 reload
mattermost can be accessed at
https://mattermost.my-domain.organd you can proceed with the mattermost configuration as described in Configuring Mattermost Server.</li> </ol> </li> </ol> </div>
-
first, the following apache2 modules must be enabled:
Virtualbox 5.0.40 crashes on Ubuntu 16.04 LTS
I am using Windows over a virtual machine run by VirtualBox. For no clear reason and on some of my computers only, the virtual machine suddenly wouldn’t want to start and systematically made the computer crash.
Description of the issue:
Host: xUbuntu 16.04 LTS
Client: Windows 7
VirtualBox version: 5.0.40
It finally appears that using the last version of Oracle VirtualBox solved the issue (with no change in the client or the host):
-
the first step consists in removing the old version of VirtualBox:
sudo apt autoremove --purge virtualbox
-
then, edit the file
/etc/apt/sources.listand insert the following lines:deb http://download.virtualbox.org/virtualbox/debian xenial contrib
-
finally, the new version of VirtualBox is installed with
sudo apt update
sudo apt install virtualbox-5.2
The virtual machine should work from scratch or with some minor tweaking on the configuration on the new VirtualBox.
Solving a bad sector block problem on flashdisk
After I used flashdisk-creator on Ubuntu 16.04 LTS to create a live USB with one of my flashdisk, it wouldn’t want to be formatted anymore. gparted kept on displaying the following message:
Warning: The driver descriptor says the physical block size is 2048 bytes, but Linux says it is 512 bytes.
and partition creation stopped with a failed status. After a few searches, I discovered that the problem was caused by a well-known bug of flashdisk-creator that had actually damaged the driver descriptor. The command dd was able to solve my issue:
sudo dd if=/dev/zero of=/dev/sdb bs=2048 count=32
where <code pointed to flashdisk. The option count=32 was used to limit the dd command execution to the first 32 sectors, otherwise, the command was much too long to run.
Issue with Avahi network service discovery on xUbuntu 16.04 LTS
On xUbuntu 16.04 LTS, I was constantly having the following error message on startup:
Network service discovery disabled. Your current network has a .local domain, which is not
recommended and incompatible with the Avahi network service discovery. The service has been disabled.
As my friend Stéphanie is very sensitive to error messages on her computer (and I am her sysadmin), I started searching where this issue came from, when she asked for help. It turned out to be linked to the start of avahi daemon, which is only useful for a very limited number of applications, mainly using the local network and almost all being developed by Apple. So the solution was pretty simple: I prevented avahi daemon to start by editing the file (admin mode) /etc/default/avahi-daemon and by changing the option
AVAHI_DAEMON_DETECT_LOCAL=0

